… even to the mainstream media. Mead is awesome.
Author: JWL
Slow Fermentation
By talking about “slow fermentation,” I’m not referring to a fermentation technique but rather about the phenomenon that fermentation seems to slow down in the colder weather. Despite the fact that my brews stay indoors where we have heat, the ambient temperatures are lower, which is enough to slow down the yeast.
Last summer, I was blasting through berry meads that finished primary fermentation in 3 or 4 weeks. Now, I have a batch of Cacao Mead 2.0 that’s been fermenting since mid-December, and it’s only now ready to rack (now gotta find time to do it). In addition, the Prickly Pear Mead is ready to rack as well. Finally!
In the winter, my mead stocks get low because they aren’t replenished as quickly. I’m definitely looking forward to both replenishing my mead stock, and brewing more frequently with fresh ingredients from my ecosystem!
In addition, I have some INCREDIBLY exciting news in the pipeline that I can’t quite share just yet. Watch this space, because when this news becomes reality a lot of things will change, for the better (how’s THAT for a cryptic message)!
Brewing Mead with Chaga
Out of all the ingredients that consistently end up on my labels, I am by far asked most often about chaga. The notion that one can enhance their alcohol using mushrooms is, I suppose, somewhat counterintuitive; I think people picture mushroom gravy from a deli mixed with beer or something similar. But as it turns out, chaga adds a delightful layer of flavor, a beautiful darkening colorization, and plenty of nutritional reasons to include it.
I remember the first time I harvested chaga from the wild. I was spending the weekend with a friend, a quiet retreat in a cabin in the Maine woods. We spent the entire trip in to the cabin looking at every white birch we encountered, combing the surface of each tree for the blackened, charred-looking protrusions, the telltale signs of chaga growth. We saw no sign whatsoever of chaga on the hike in.
After searching for several days, we finally found some ripe chaga — on a birch tree not 10′ away from the corner of the cabin. The tree wasn’t doing particularly well; once chaga is blossoming the tree is doomed and will die within a few years. There was a ladder handy, and with a good knife the chaga came right off. It was a large tree, and we harvested enough to last each of our families several months. It’s no coincidence that my companion on this trip was a friend with whom I’d spent a lot of time brewing beers, before I discovered the benefits of mead.
Normally I decoct the chaga into a delicious tea, simmering it for several hours, most often in a crock pot, until I have a beautiful beverage that looks like coffee and tastes very clean, with a hint of maple and vanilla. I use chaga tea (sometimes with other herbs such as reishi) as a base for my elixirs, which I drink nearly every morning in the winter.
This same tea is the basis for many of my meads, particularly fruit meads using berries. Beginning with chaga tea rather than water has several benefits for the mead. First, you get all the nutrition and herbal benefits of the chaga. Second, the chaga adds a nice mellow layer of flavor that is subtle in the finished mead, but mellows things out nicely. Third, while the finished mead isn’t coffee-like in color like chaga tea, it does darken the final mead product noticeably and beautifully.
When I brew mead with chaga, it’s usually a 3-gallon batch. Therefore I will brew 2 gallons of chaga tea, adding about 2 fistfulls of chaga to 2 gallons of spring water, and decocting for 4-6 hours minimum. With this 2 gallons of tea, I follow my basic mead recipe, which is described in detail in my meadmaking eBook.
I have not yet experimented much with tincturing chaga, either done traditionally with vodka or another distilled alcohol, or in the mead during secondary fermentation. UPDATE: I have now done several double extractions with both chaga and reishi, my technique is detailed here.
In addition, I tested meads in the Mad Trad Trial, 2 of which used chaga, the other 2 did not. The color of the finished mead was every-so-slightly darker, but perhaps more importantly the 2 batches done with chaga cleared much more quickly than the 2 non-chaga batches. This preliminary empirical evidence suggests to me that there is something in the chage, perhaps electrolyte related, that causes the mead to clear more quickly.
All in all, chaga is probably my #1 favorite herb in my life, and I absolutely love what it does to my meads. I encourage you to experiment with it (or whatever your favorite herbs are) when you brew.
Donations
Several of my readers (of both the website and the eBook) have asked me how they can support BardicBrews.net. One answer is to make as many outstanding fermented beverages as you can, and maybe one day share one with me. :-)
Another way to support us is to purchase our eBook.
If you would like another way to support us, we added a donate tab to the site. We created this site from a love of fermenting beverages in the highest quality possible, and freely sharing the methods and techniques we’ve developed. If this information has value to you and you’d like to support us, please feel free to donate an amount that works for you.
Treequinox Mead
It’s the First Day of Spring — Eostar, Ostara, the Vernal Equinox — in Maine, and I’ve been interacting with trees in my ecosystem as of late. They are like old friends that I haven’t seen in a few months. I wanted to honor this part of the seasonal cycle with my next batch of mead. We still have some snow on the ground, but it’s melting fast and there’s as much mud as snow. The trees are waking up, and I knew it was time to make a Treequinox Mead.
In northern New England, spring also means maple tapping season. It takes 40-60 gallons of sap, boiled down to reduce to 1 gallon of maple syrup. A friend was kind enough to bring me 4 gallons of maple sap the other day (thanks Jason!), and I knew I wanted to use it in a mead. Another friend, Arthur Haines, just posted a video about maple season:
Arthur is a botanist, and has written the best field book for my ecosystem that I’ve yet seen. He explains the process of getting maple sap skillfully and sustainably.
I used 2 gallons of the sap for the Treequinox Mead as a base, rather than the spring water I normally use. The other two are presently reducing into syrup on our stove.
I also had to cut down two trees in my yard for mushroom cultivation. We live on 2 acres of forest, and get little sunlight. We haven’t had much luck trying to grow vegetables, but I’m hoping that mushrooms will fare better. I wanted to use plug spawn, which requires fresh logs, so I knew I would have to take down a tree. I wanted to grow chicken of the woods (Laetiporus conifericola) and Phoenix Fir Oyster (Pleurotus pulmonarius), both of which grow on the Eastern Hemlock tree. Hemlocks are plentiful on our property, so it was easy to find one that was ready to be taken down. We also had to take down a fir tree to get the hemlock down safely. Both trees have been cut into 4′ logs (thanks again Jason!), which will rest for a month or so. Live trees contain anti-fungal compounds that dissipate a few weeks after the tree is cut. Both mushrooms grow on both hemlock and fir, so I’ll plug some of each species of mushroom into both species of log.
This also meant I had an abundance of both hemlock and fir boughs, that are now going to dry out and decay. I wanted to use as much of the tree as possible, so I gathered about a gallon of the boughs, along with some additional spruce in my yard, and made a Fir, Hemlock, and Spruce tea in the maple sap. I rinsed the leaves and then decocted them for 15 minutes in 2+ gallons of maple sap, removed the heat and put the pot on the back porch to cool off.
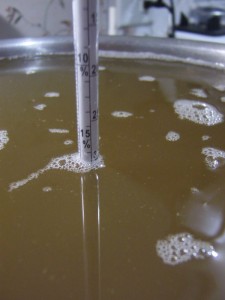
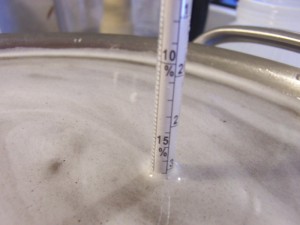
Once the tea had cooled to blood temperature, I brought it in and strained it. It tasted delicious! The sap is already sweet and the evergreen flavor was really good. I then added about 3/4 of a gallon of honey, adjusting the amount until I got an alcohol potential reading of 17.5%:
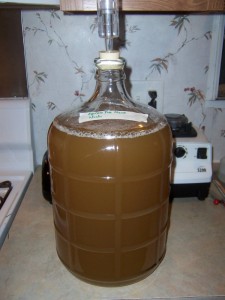
The conifer leaves have some citric acid in them, but I did make 3 cups of organic black tea for the tannins. I then pitched the yeast as normal, and am left with a beautiful 3 gallon batch of Treequinox Mead:
Don’t worry, Spruce Mead fans, I still plan on making another batch of Spruce Mead this year….
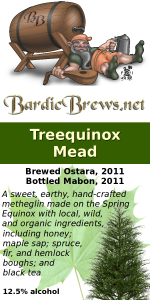
UPDATE: I just racked this mead and it’s delicious! Very similar to the Spruce Mead I made last year, but not as cloyingly sweet. It is still quite sweet though, at 5% remaining alcohol potential, meaning this batch is 12.5% alcohol. This mead is already starting to clear, unlike the Spruce Mead from last year which is still not clear!
UPDATE: I haven’t been posting labels much recently (since they are all variations on the same theme), but this one turned out especially cool I thought, with the maple leaf in the background and the hemlock tree in the corner:
Coca Kola Mead
I’m really amused by this mead, on several levels. Obviously the name might have a familiar ring to some, but I’m actually referring to the generic ingredients: Coca leaves and Kola nuts. These ingredients were originally used in the more familiar iteration of these particular words.
In past decades, I drank a lot of modern cola industrial soft drinks, most of which were made with corn syrup and contained no coca at all. I’ve often wondered what the original formulations would have tasted like, so I decided to recreate it with a mead.
First, let’s take a closer look at these two ingredients.
Coca
In preparing for this mead, I wanted to thoroughly research coca for somewhat obvious reasons. Coca is very controversial because it contains the alkaloid cocaine, which is of course illegal and has become a problem with its use in its commercialized, concentrated form of white powder after having been extracted from the leaves. Regular Coca Leaves, in the United States, are also illegal, categorized as a Schedule II drug. What is not so widely known is that coca leaves can be “decocainized” in the same way that some coffee beans are decaffeinated. These sort of decocainized coca leaves are legal to import into the US, and are not scheduled in the same way regular coca or cocaine is:
Coca leaves (9040) and any salt, compound, derivative or preparation of coca leaves (including cocaine (9041) and ecgonine (9180) and their salts, isomers, derivatives and salts of isomers and derivatives), and any salt, compound, derivative, or preparation thereof which is chemically equivalent or identical with any of these substances, except that the substances shall not include decocainized coca leaves or extraction of coca leaves, which extractions do not contain cocaine or ecgonine.
Source:
[Code of Federal Regulations]
[Title 21, Volume 9, Parts 1300 to end]
[Revised as of April 1, 2005]
From the U.S. Government Printing Office via GPO Access
[CITE: 21CFR1308.12] [Page 94-96]
Cocaine, however, is but one of several alkaloids in the coca plant. Coca tea, in South American circles where it has been used for thousands of years, produces effects very similar to coffee, another drink from that region that Americans have grown quite accustomed to. And since it was a common ingredient in old brews including the original colas, I wanted to use it in this mead.
Kola
The Kola Tree is an evergreen tree native to west Africa. The tree produces nuts as seeds to reproduce itself. The Kola Nut, in its native land, is valued for its stimulating, aphrodisiac and healing qualities, which to me seems similar to how people use cacao in South America. The trees are related.
Kola contains a significant amount of caffeine, and as such is sometimes used as a remedy for asthma.
The cola can be extracted by boiling or tincturing the Kola nuts. For this mead, I decided to tincture the kola, which will happen after primary fermentation, after I’ve racked it into jugs for clearing it will sit with the Kola nuts to extract their colors, flavors, and other properties.
Mead
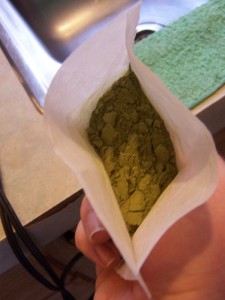
I began this mead by making a coca tea. The coca I was using was powdered, which maximizes its absorptive surface area. I was concerned about being able to filter it after the tea was done, as the powder is too fine for my screens/sieve, so I used a new kind of DIY teabag designed for a teapot (as opposed to a cup). With this sort of bag, you fill it half full of your tea (coca powder in this case):
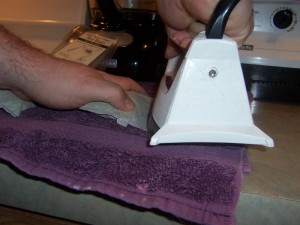
Then, once the bag is half full, you use a common iron to seal it shut:
This left me with two large teabags containing coca leaves:
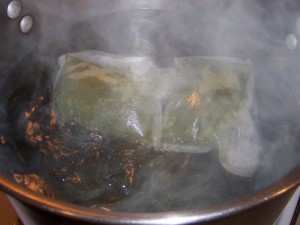
I wanted a strong Coca tea, so I decided to decoct it. On the other hand, I didn’t want it to be too tannin-y, so I opted for a short 15 minute simmer:
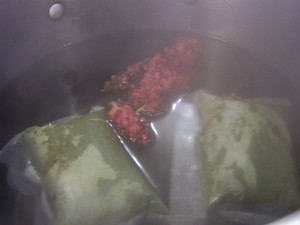
After the simmer, I wanted to continue to let it infuse for a few minutes. I also added a sumac drupe for its acids to help the yeast:
I let the infusion sit for about an hour, then strained the teabags and the sumac drupe out. After it cooled for several hours I poured the tea through a strainer (to get the small bits of sumac out) and added it to the pot with just under a gallon of honey, dissolving until I brought it to 17.5% alcohol potential (I wanted a strong and sweet mead for this batch):
I was left with a relatively neutral color mead, with a slightly golden hue. The mead’s color will not shift much during primary fermentation, but I expect the Kola nuts that I will add after racking to darken it considerably:
This is a somewhat complex batch with many steps, there will be several updates along the way over the next few months.
UPDATE: June 28
I racked the mead tonight, tried a bit of it, and failed to take a hydrometer reading, since I dropped the hydrometer and it shattered on my floor. Ah well. I’ll pick up a new hydrometer soon and get a reading up here.
The mead tastes fantastic. It has a smooth, tangy effervescence to it (it’s not sparkling, but the tangy part of the flavor is not unlike 7up in a strange way).
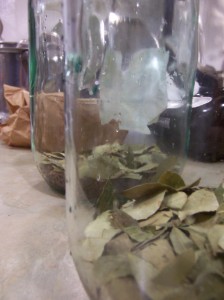
I racked it into one-gallon jugs, into which I had stuffed 4 handfuls of Kola nuts and Coca leaves, so it will infuse/tincture over the coming weeks.
The mead that I racked into the waiting Kola nuts got darker very quickly, and the kola nuts caused a slight bubbling to form:
I will continue to update people as this mead develops! Very exciting, this could end up being one of the best batches yet.
UPDATE: June 29
I got a new hydrometer, so I took a reading today. It’s 4.5%, so it’s still quite sweet and about 13.5%. I’m not 100% sold on the accuracy of this reading since the “before” reading was taken with a different instrument. I don’t know how consistently calibrated these are. It does sound about right though; this mead is sweet but not cloyingly so.
Also, the bubbling has slowed down but is still happening….
UPDATE: July 27
I just tried the first bit of Coca Kola Mead. Wow! The Kola Nuts definitely add a layer of strong flavor. It’s a deep, rooty flavor, definitely reminiscent of cola, or perhaps even root beer. I need to bottle this soon so it can begin to age a bit. I imagine this will be extraordinary in a few months!
Harper Meader Podcast Interview
This week on the Sweet Peas Podcast, we were very happy to interview Harper Meader, who in addition to being a contributor to this site and my meadmaking mentor, is a fabulous storyteller and interviewee.
He was kind enough to bring a 1996 pumpkin mead — fermented inside of a pumpkin — that we shared on the air. If you’ve never had a 15 year old mead, well, words fail.
This is one of my favorite interviews we’ve done for the podcast…. check it out (get the mp3 here, or the rss subscription file here). In this episode, we refer to a posting on this site by Harper, called So You Brewed Some Mead…. You can find it there.
Mountain Rose Herbs
I always prefer to harvest herbs wild from my ecosystem. However, this is not always possible, and sometimes I want to experiment with herbs that don’t grow in Maine. When this is the case, I regularly get such herbs from Mountain Rose Herbs. I’m always impressed with the freshness and the quality of their plants; many of the herbal brews on this site were prepared with herbs from Mountain Rose.
In addition, their website is a fantastic reference for herbalists in general, with plenty of info about various herbs, their properties, how to prepare them, their cultural lore, and more. This is often the first place I turn to look something up.
They do things the right way, and I’m proud to be their affiliate. Please support this site by ordering your herbs through the link below.
Fermentation Internships
I just heard today from Eli Cayer at the Urban Farm Fermentory in Portland, Maine. Great news for those who might want some hands-on experience in a commercial, community-oriented fermentation operation: he is looking for interns to help with production. Right now he is doing mostly ciders, but there are plans for other ferments and cultures in the future.
If you are local to Portland, and interested in spending some time learning in a commercial fermentory, contact Eli.
Bottling
Bottling night is probably the most work out of the entire meadmaking process. However, I find it essential for longterm storage of mead, as well as closely-related to the overall vibe. Pulling out a well-labeled bottle and a corkscrew is definitely part of the fully-immersed mead experience.
I’ve noticed that I’ve tended to post a review mostly of the finished bottles, and not so much of the process. Here, I’ll try to document a bit of it.
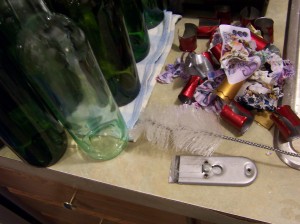
The most labor by far is cleaning and de-labeling the bottles, especially if you are using recycled wine bottles as I often do. For this you need lots of hot, soapy water, a bottle brush, and a razor blade to scrape old labels off. Here’s the result of my work, with a couple dozen clean bottles, a pile of scraped labels, and the bottle brush and razor blade visible:
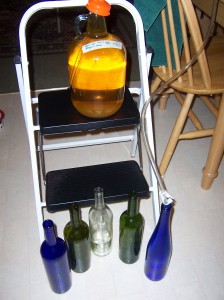
Once the bottles are clean, you want to siphon the mead from the jug (in my case, 1 gallon recycled wine jugs). You can see that I use a small stepladder to elevate the jug, so that the bottles are lower:
I also use the same cap to start the siphon as I do for the carboys, though because the lip of the jugs is too small, I have to hold it airtight around there while I blow into it to begin the siphoning process.
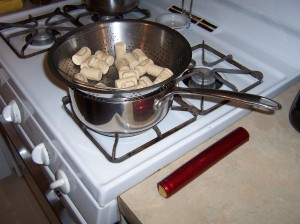
Once the bottles are full, you want to cork them. I always steam my corks, both to sanitize them and to soften them:
You can also see a dozen or two shrink caps ready to use also. Once the corks are soft, simply use a corker to apply them to the bottles. Then, put the shrink cap over the top of the bottle with the cork, use a spoon to temporarily hold it in place, and submerge the cap into the boiling water (under the steaming corks above). The heat from the boiling water will cause the shrink caps to shrink tight around the bottle within a few seconds.
Once done, clean the outside of the bottle, dry it, and apply your label!

