Luna Bochet

For several years now, I’ve had my eye on doing a bochet, which is a mead made with cooked, caramelized honey. Note that this contradicts my meadmaking methodology for the most part — I am not an advocate of heating honey. There are too many wonderful things in honey that I don’t want to kill with heat, but the allure of the rich tones of flavor with a bochet was too much temptation. I had to try it.

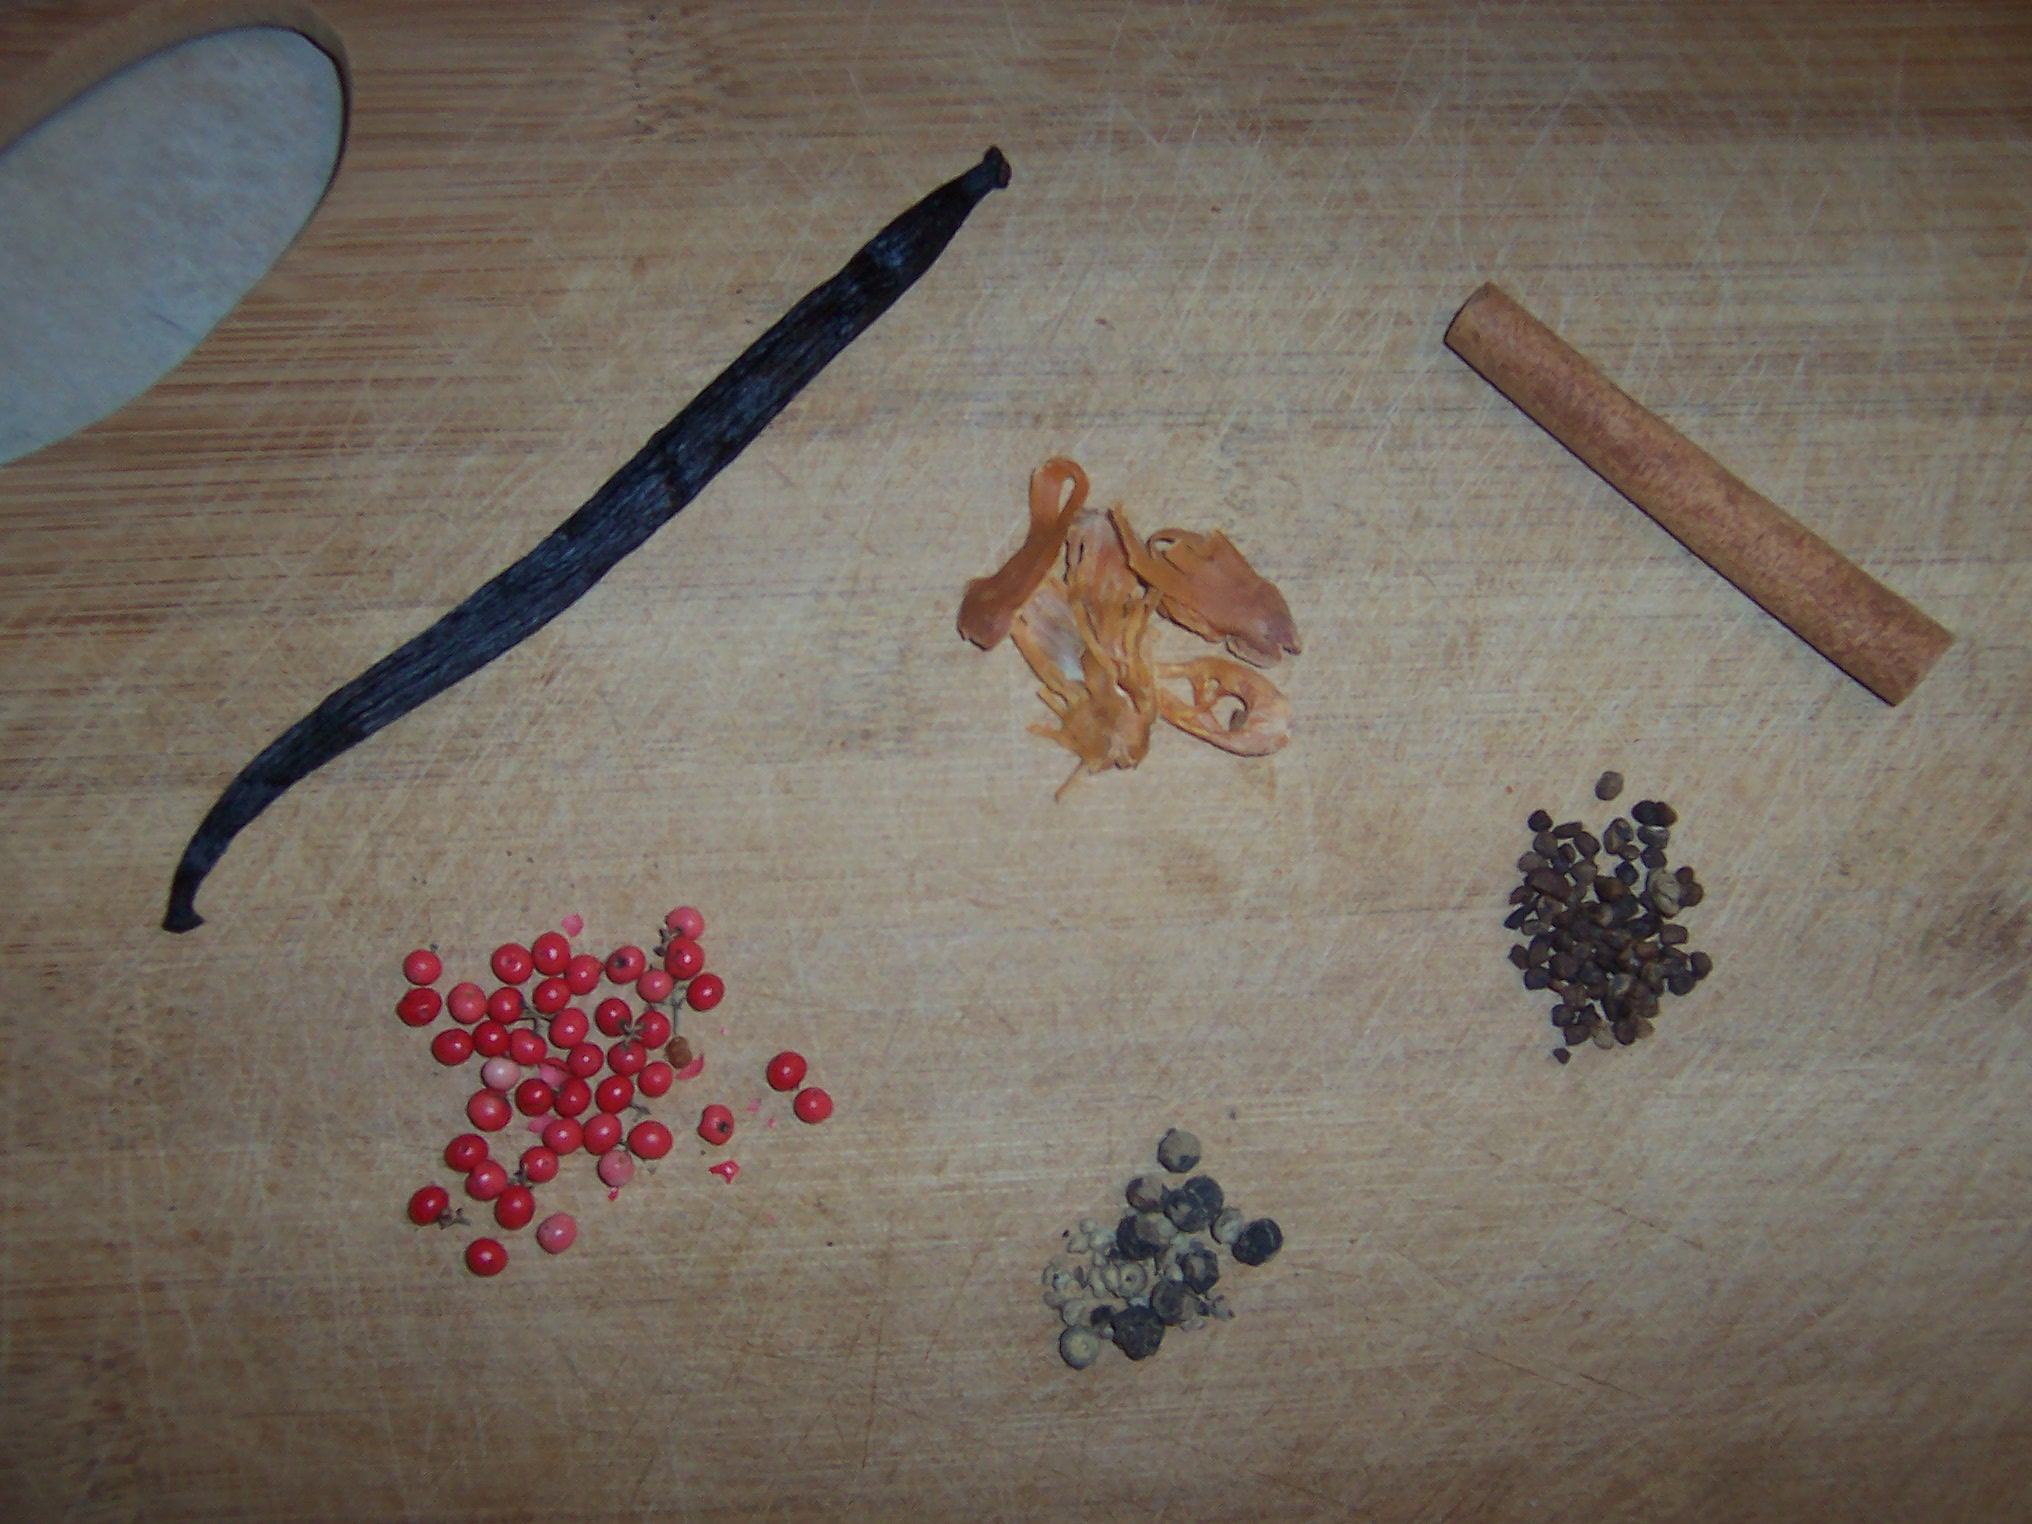
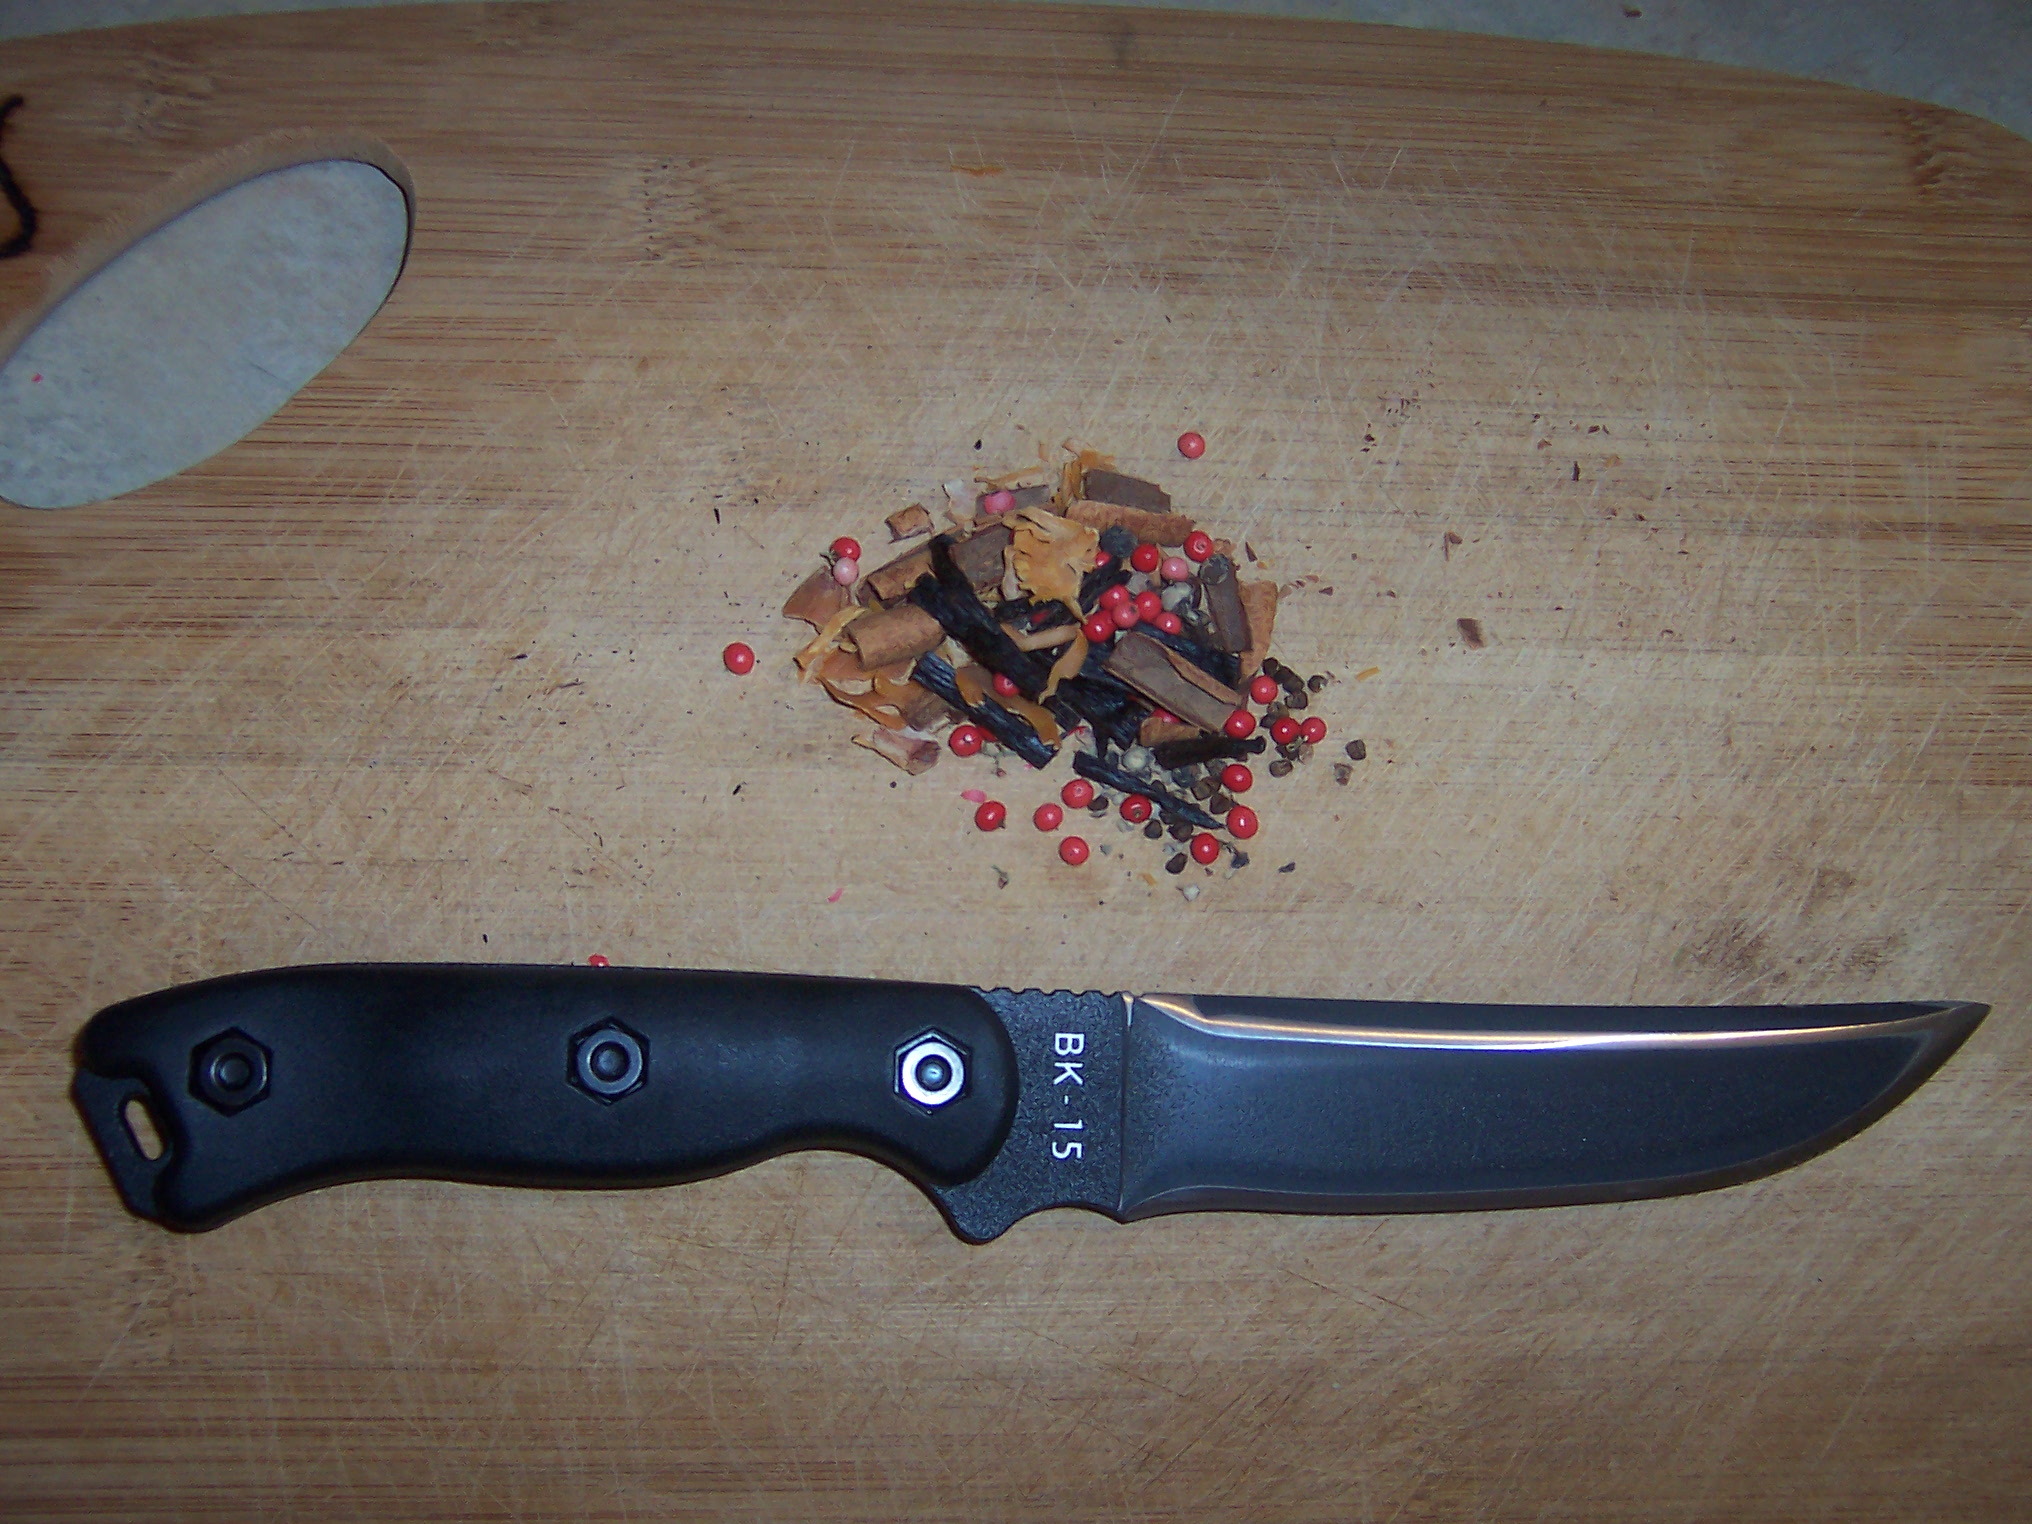
Of course, I began with a chaga decoction in spring water that I let go for about 18 hours, tossing in a couple of staghorn sumac drupes for the final 15 minutes or so:

Chaga & Staghorn Sumac, decocted in Spring Water.
Chaga & Staghorn Sumac decoction in Spring Water.

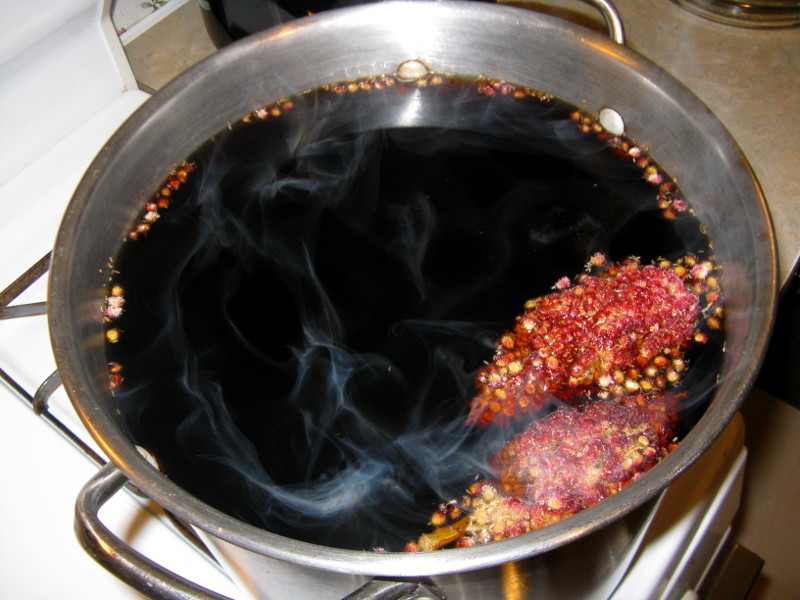
When the decoction was finished I strained it into an empty carboy, and cleaned out the stockpot for the process of cooking the honey.

Caramelizing the Honey

This is a tricky process. Honey, when it cooks, expands to nearly 3x its volume, so I had to make sure my 3 gallon stockpot had less than a gallon of honey inside. It is also essential to stir the honey constantly so it doesn’t burn. It’s a long process; I decided to cook the honey for about an hour. A small ordeal offering was in the works, during the cooking process a small amount of boiling honey splashed onto my hand and stuck to the skin, leaving a blister. Ah well; a gift for a gift.

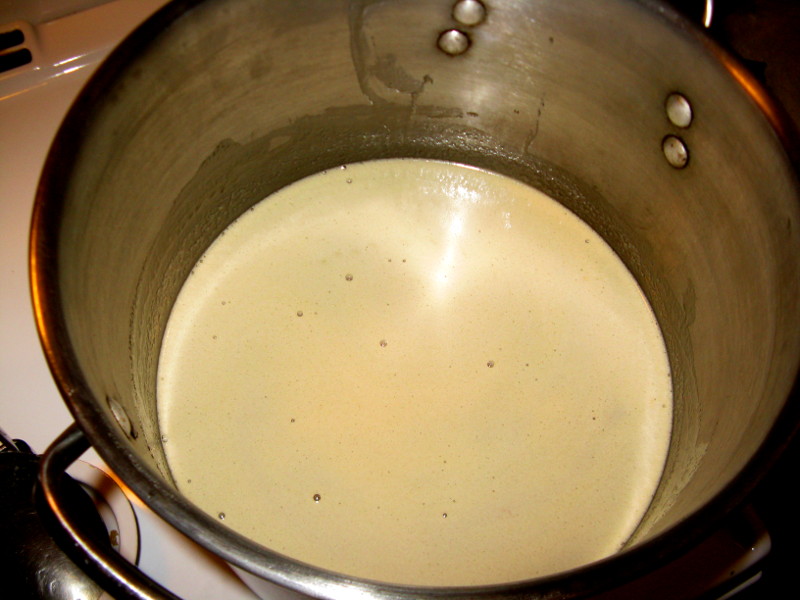
I began with solid, crystalized honey, getting it into the pot to heat up and start melting:

Honey melting in a 3 gallon stockpot. For bochet making, be sure the pot is less than 1/3 full to allow for the honey expansion.

As the honey heated up under gentle heat with regular stirring, it would start to foam a bit at the top. Just keep stirring:

Melted honey. Just keep stirring, and watch it expand, like magic, to 3x its original size!

Once the honey hits its boiling point, things start to happen very quickly. This is where it is most important to keep stirring, so as not to scorch the sugars, and the honey expands 3x to fill the pot within a matter of a few seconds. Do NOT leave this unattended! You could have a huge mess on your hands.

Boiling honey, expanded to 3x its normal volume

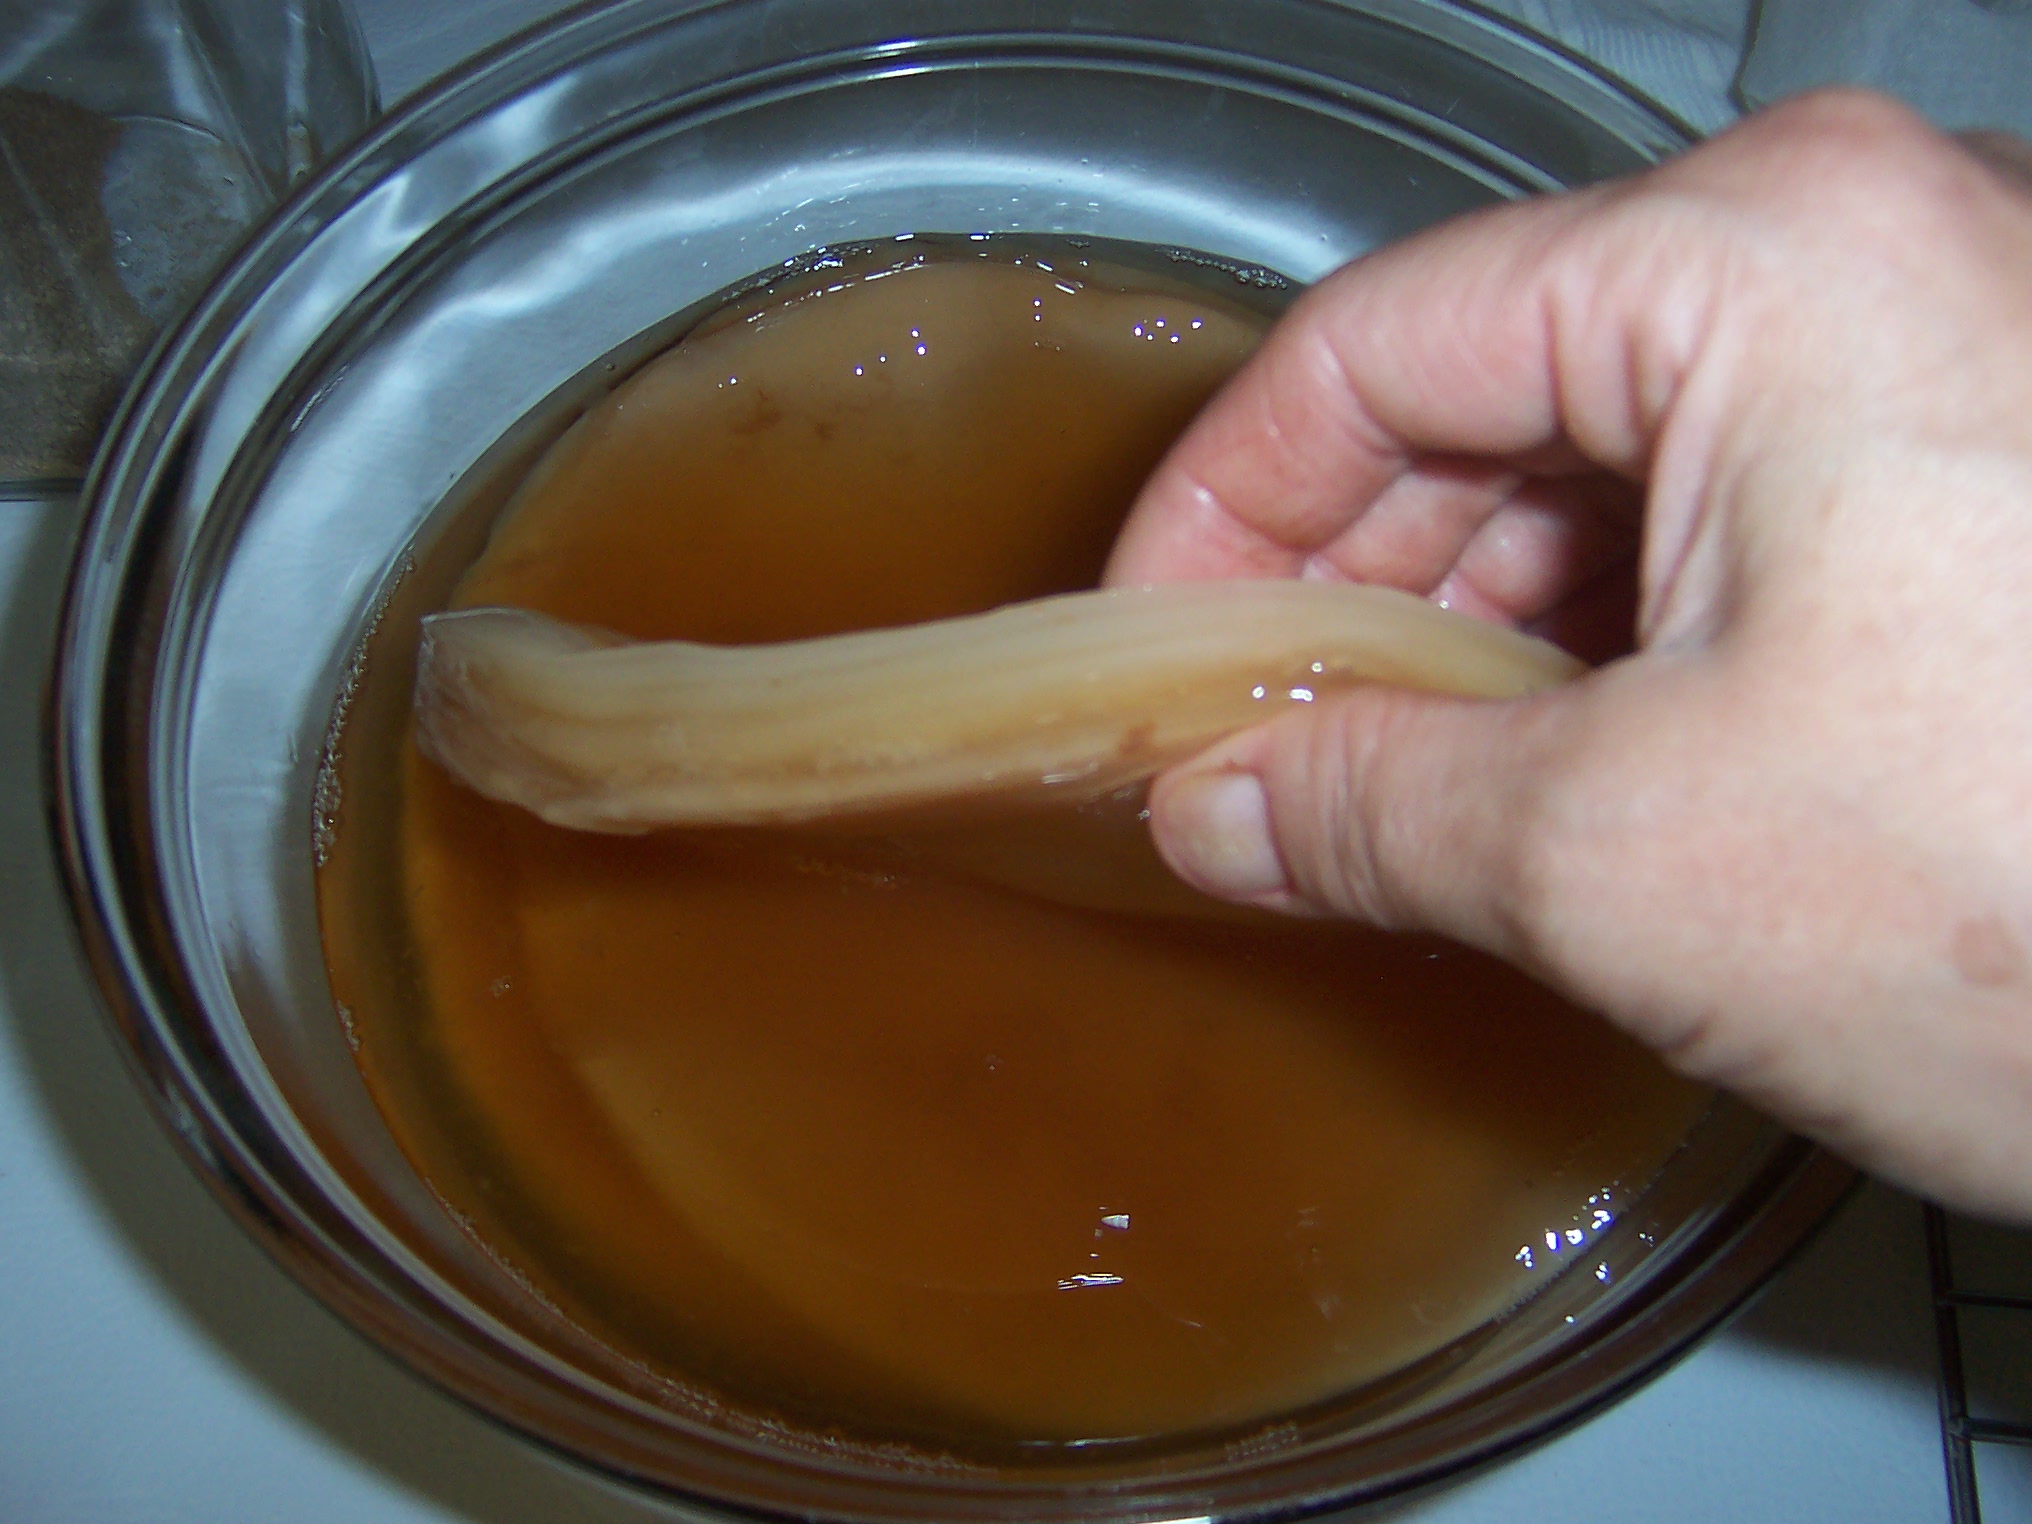
Once the honey is at this point, the real work begins. It’s important to CAREFULLY monitor the temperature of the flame and keep stirring. For an hour. Don’t let it stick or boil over. The sugars in the honey will begin to caramelize. Every 20 minutes, I took a sample of the honey:

Honey samples taken every 20 minutes, starting with the honey just when it started boiling at the top, then clockwise every 20 minutes, with the bottom left after a full hour of caramelization.

It was interesting to follow the flavor development as the honey caramelized. In some ways, the first sample taken 20 minutes in had the most intense flavor; it seemed to mellow out and get richer as it aged, finally the bottom left, fully caramelized honey was wonderful.

At the end of an hour, I turned off the heat. The honey then contracts pretty quickly, within a few minutes. Very important — if you let it cool completely, you will end up with extremely thick honey many compare to roofing tar. Therefore it is important to add your liquid before you get to this stage. In my case I added the chaga/sumac tea, which was still warm. Adding hot water helps the mixture to not splash as much when you are adding the liquid:

Adding my hot tea to the honey that has started to cool a bit. Very important to poor slowly, and keep stirring, to avoid bubbling and splashing.

I added 1 gallon of the warm tea (I’m saving the rest to finish off this batch, and to do another batch of plain traditional mead in the next day or two). Then, I VERY SLOWLY added some cool spring water, to get me up to close to 3 gallons.

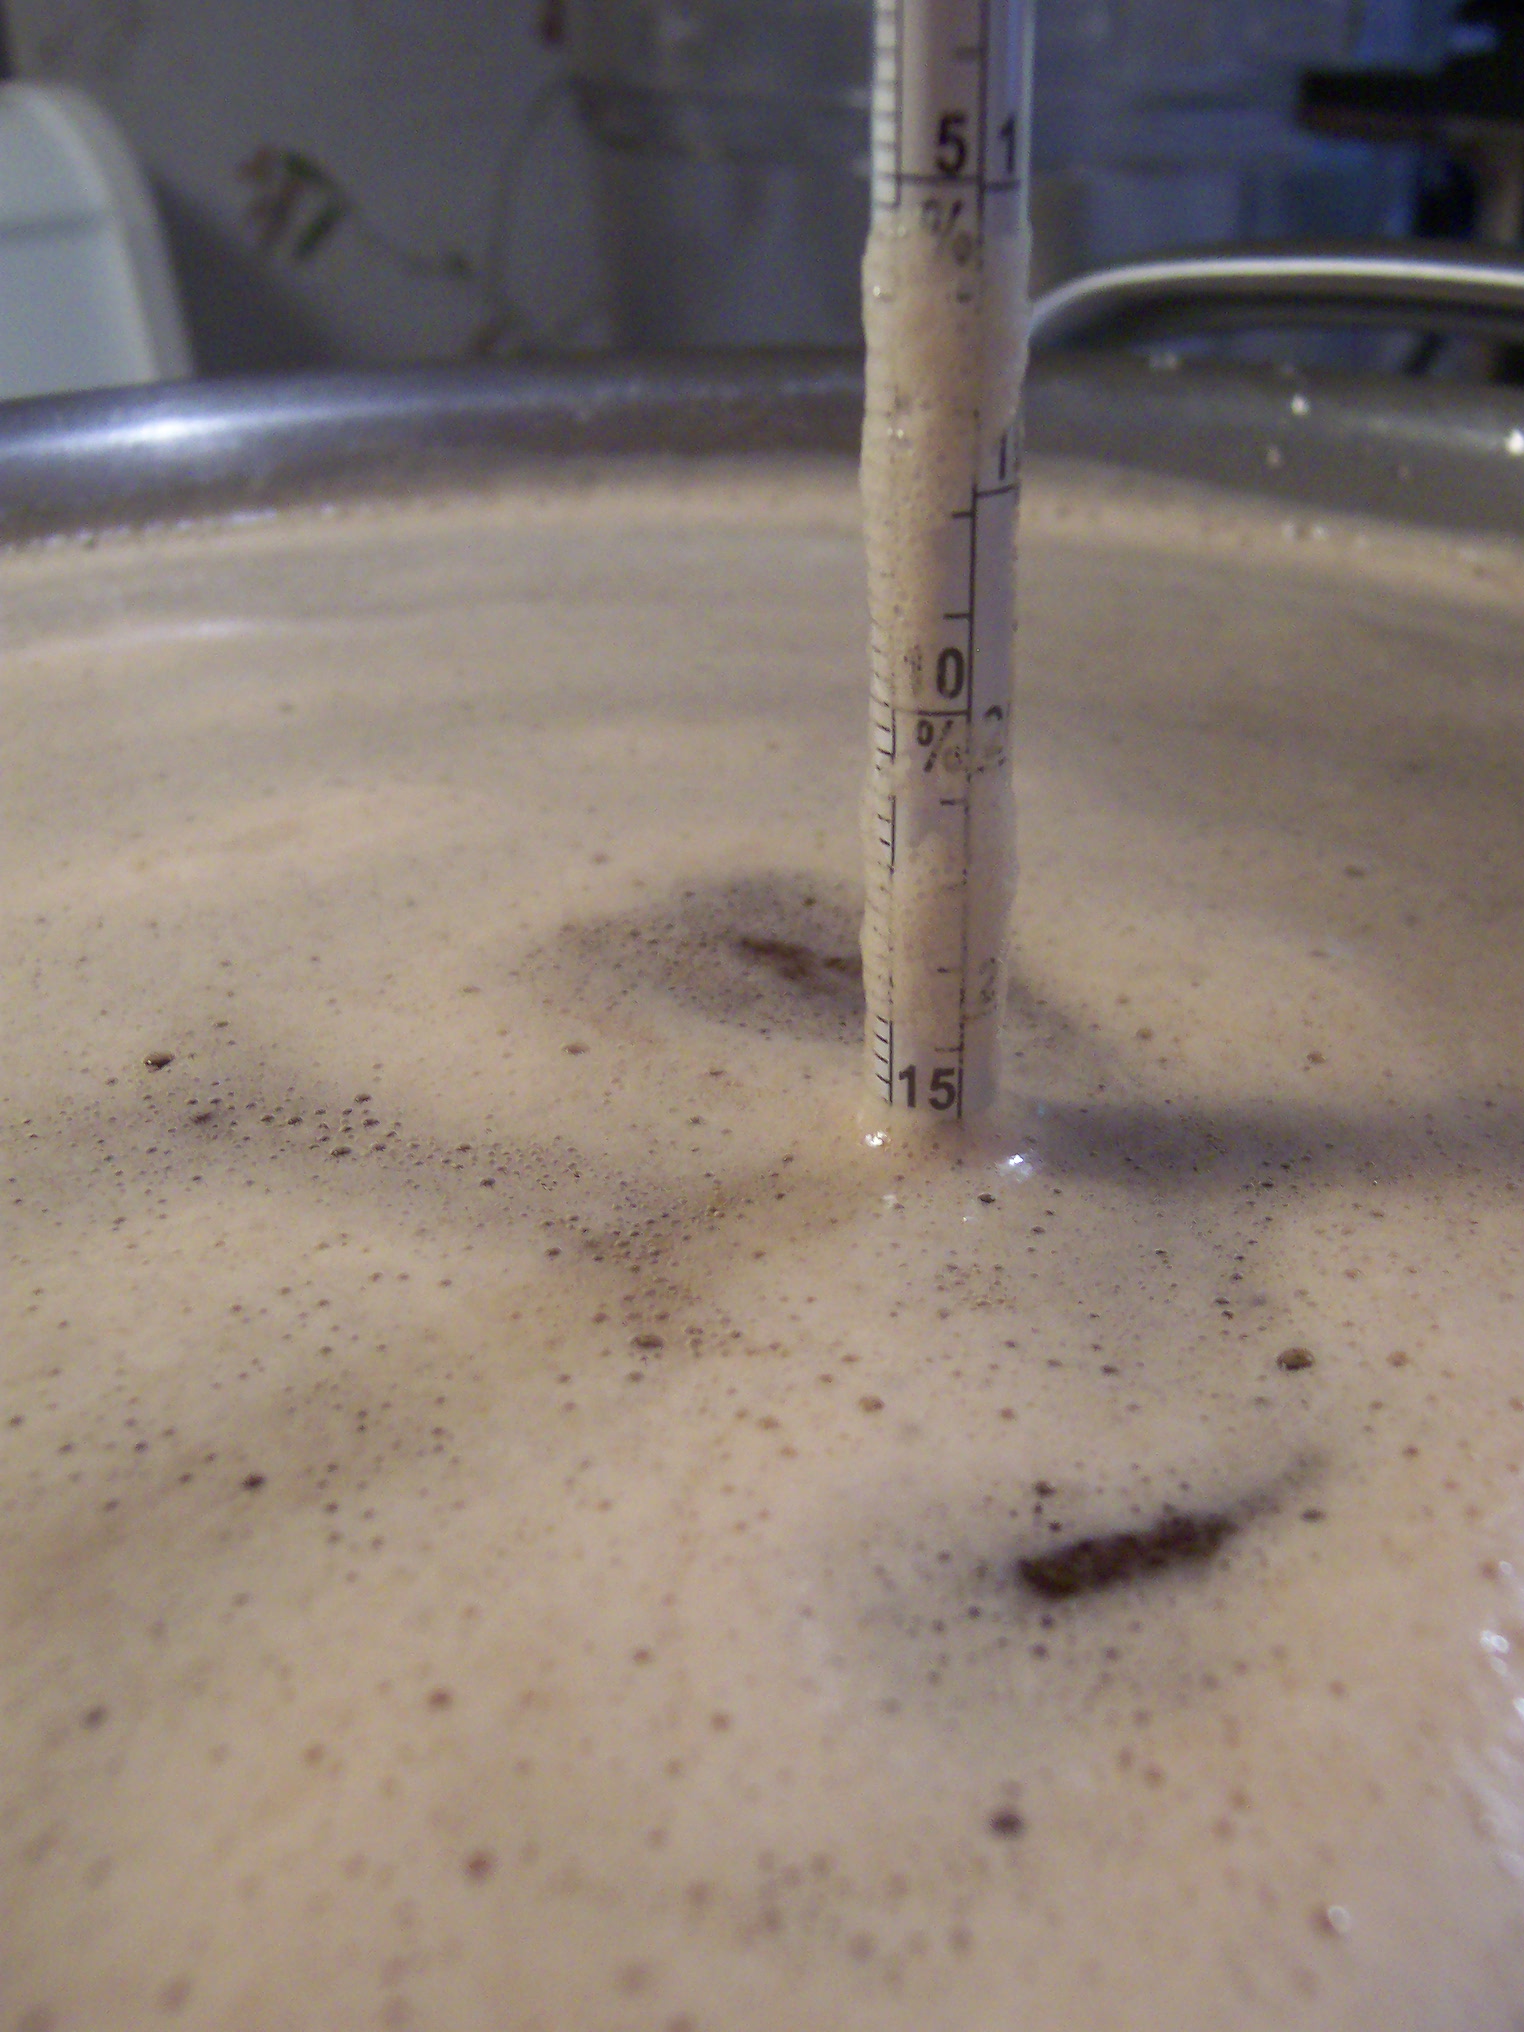
Normally at this stage I would take a hydrometer reading to see where I am in terms of alcohol potential, but the mixture is still far too hot. Therefore, it went outside under the snow (with a lid on), and under the full moon behind the clouds. Within a couple of hours, it had cooled to blood temperature:

Living in Maine has its advantages when you need to cool off a must.

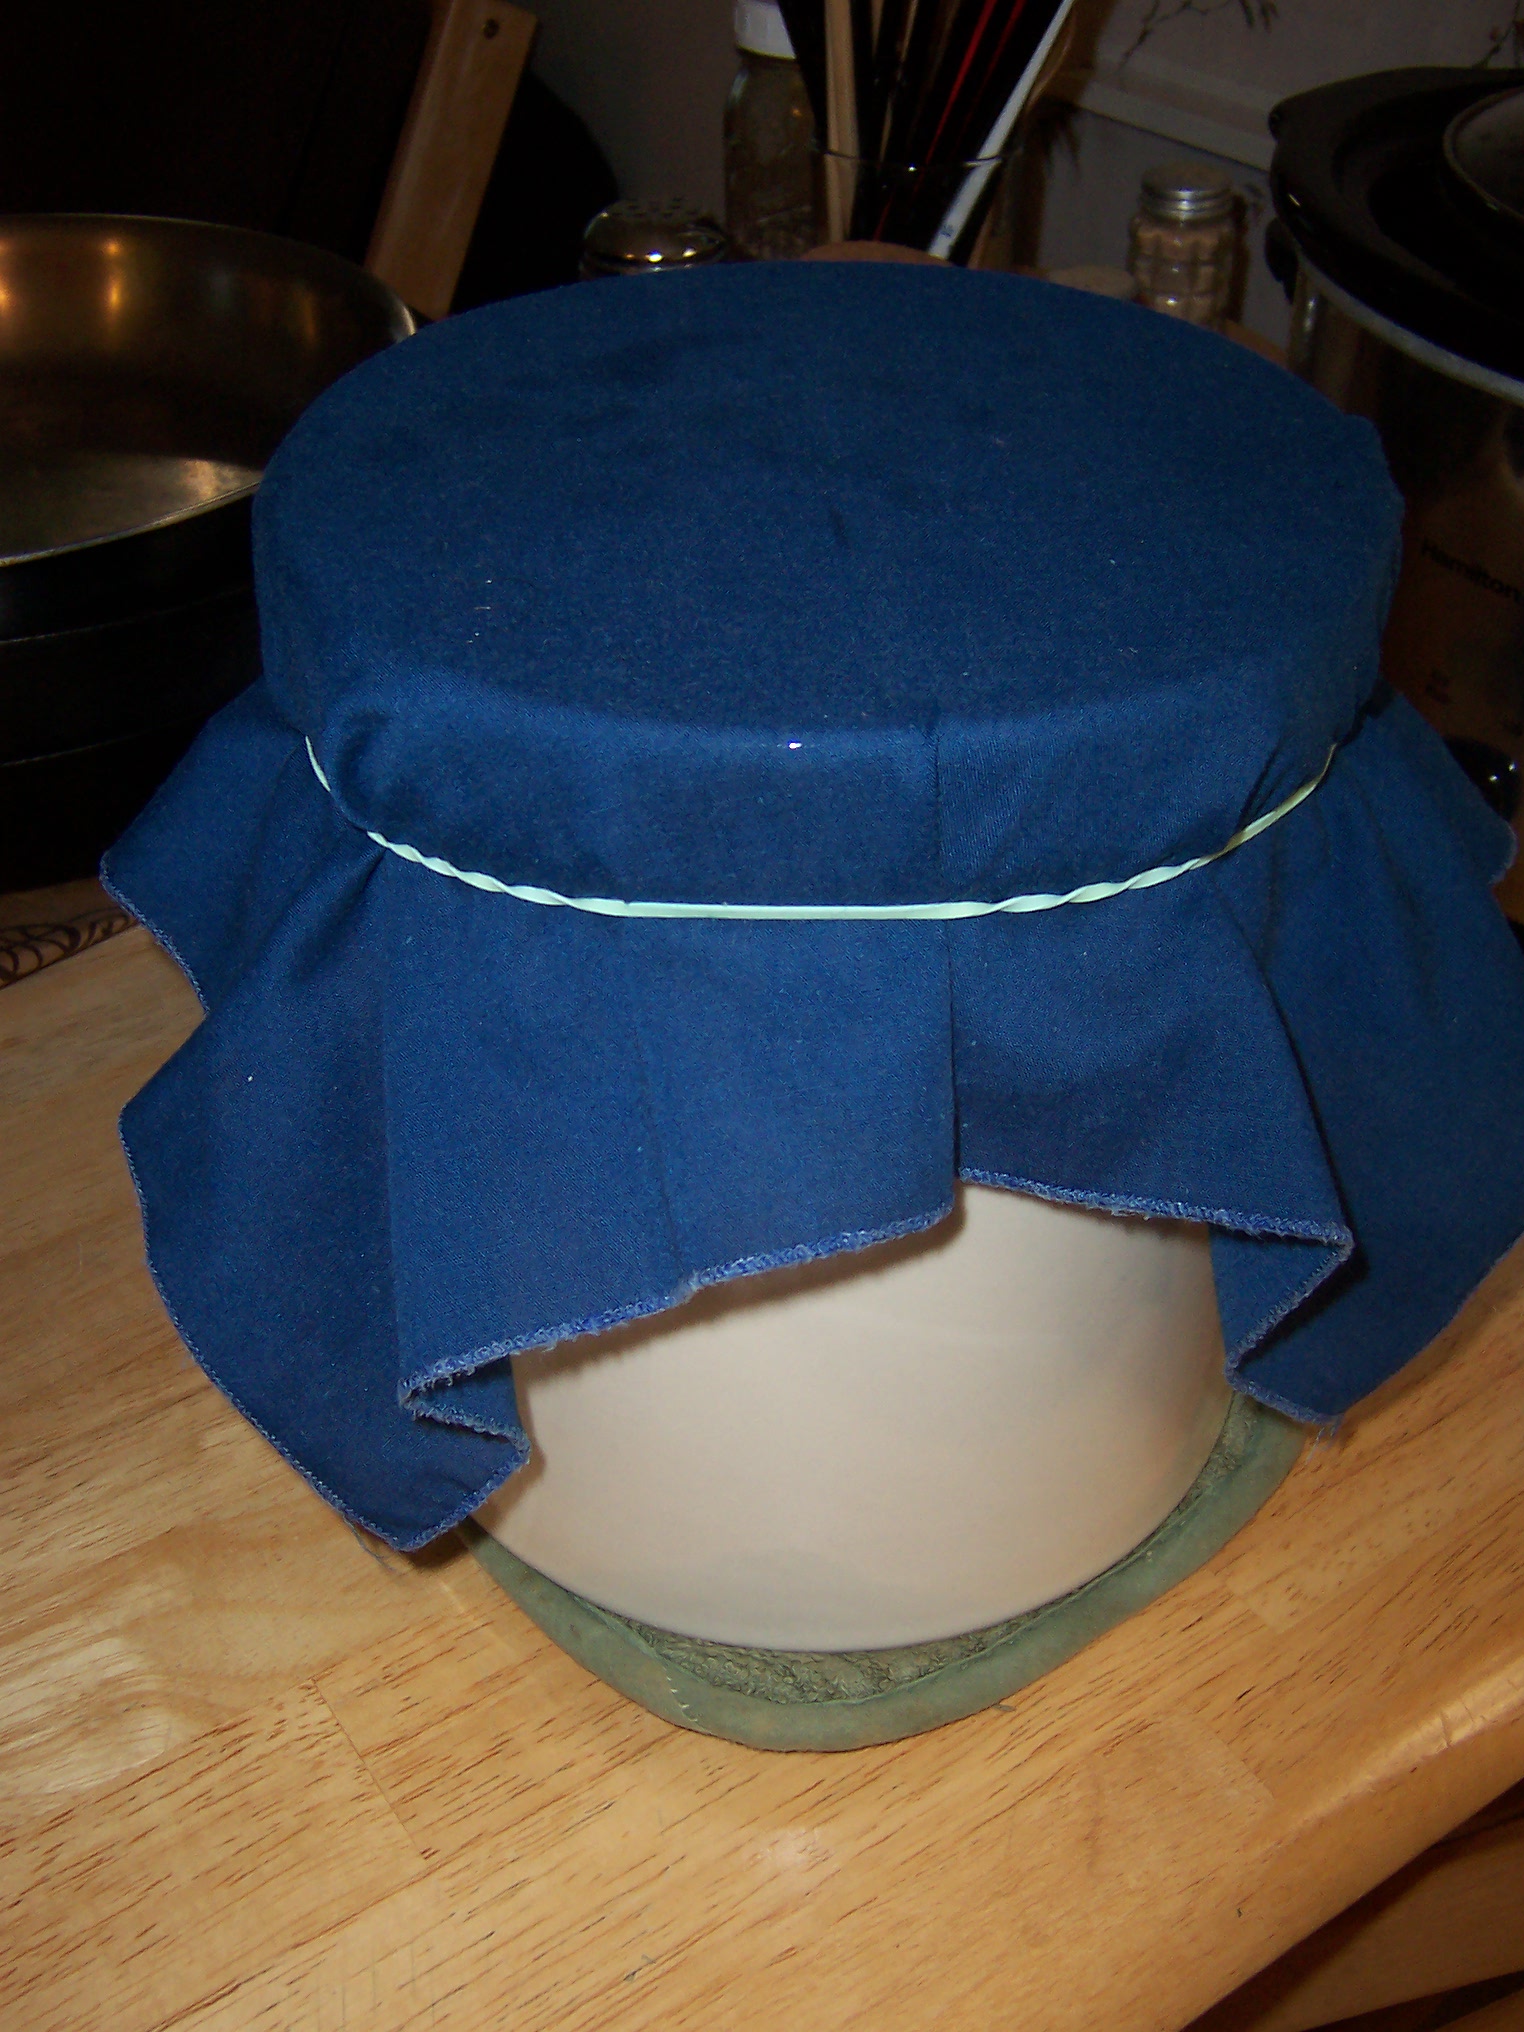
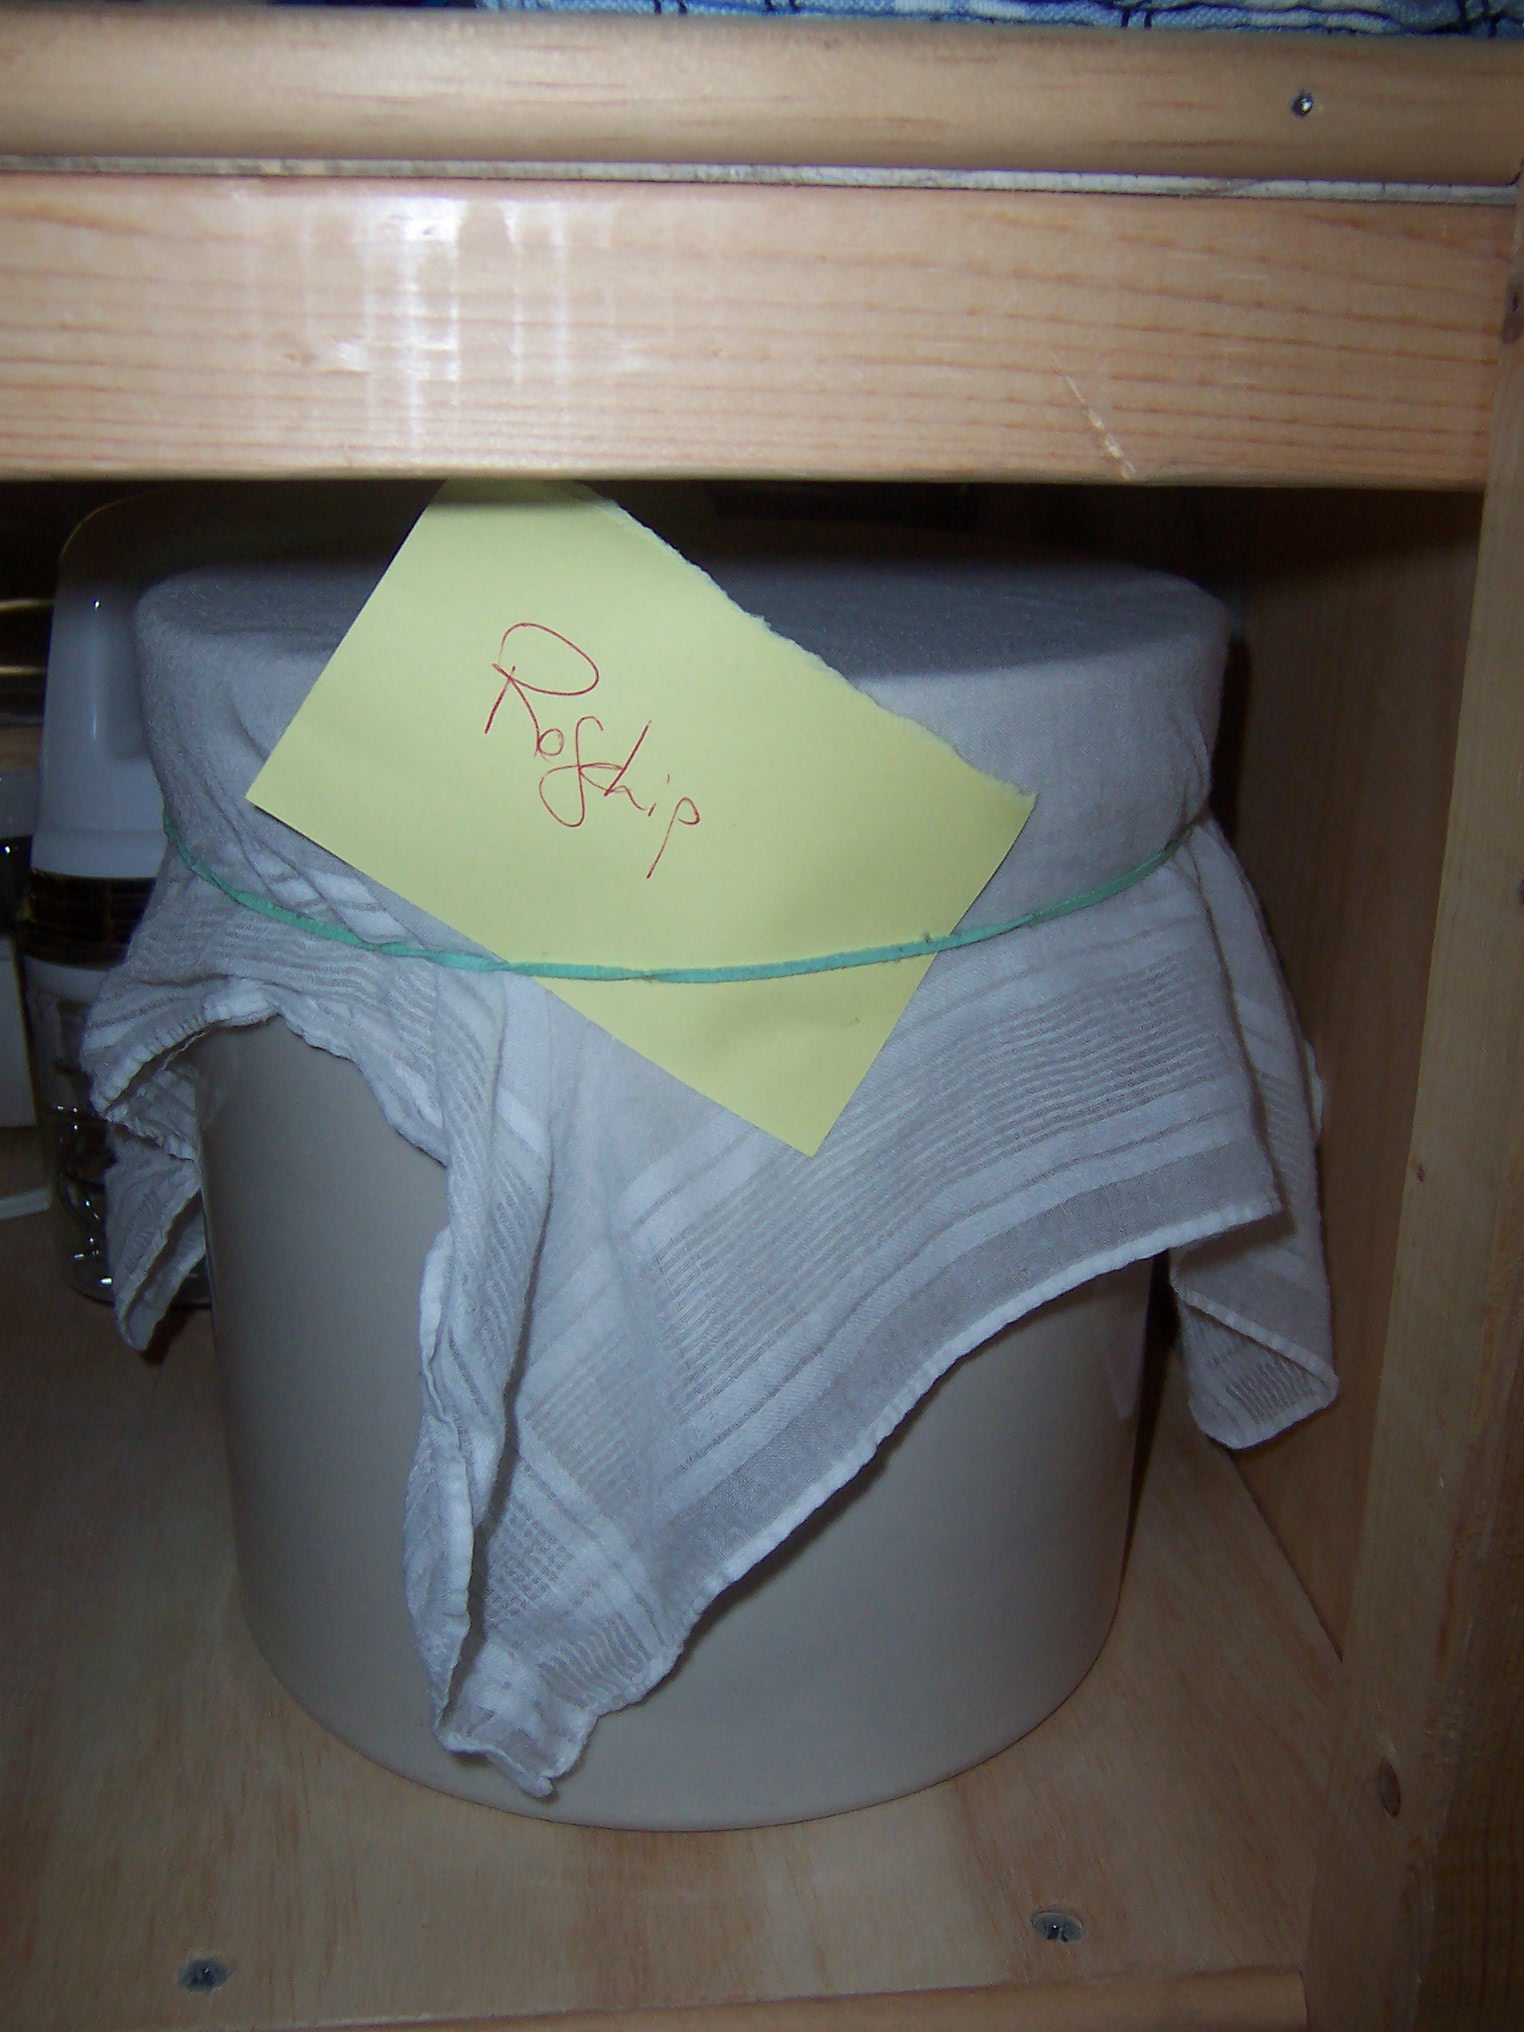
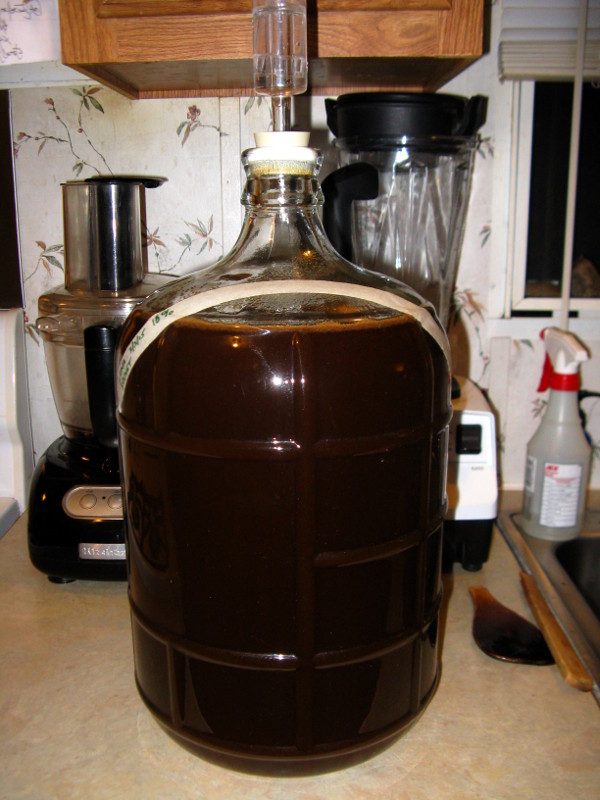
Finally I brought it back inside, adjusted the final levels to get me to an 18% initial alcohol potential, pitched the yeast, poured it into the carboy, and was left with this utter thing of deep brown loveliness:

Luna Bochet, at an 18% initial alcohol potential.

Needless to say, I’m extremely excited to see how this one comes out in a few months! Hail!

Meadmaking Workshop – Sat Nov 16

I’m excited to announce that my next meadmaking workshop is set up and ready to go in Portland, Maine on Saturday, November 16 at The Honey Exchange. The Honey Exchange is a fabulous resource for meadmakers in the area, because they offer a very wide variety of honey to use in our meads! You can get a base honey for about $50/gallon (this is enough to do a 3 gallon batch of very sweet honey), and they have more exotic varietal honeys available at various prices.

Mead-Workshop-Flyer - 2

Registration for the workshop is $50, and you will also have an optional opportunity to brew your own batch of mead and take it (and all the equipment) home with you. The brewing equipment kit is $75, and you can choose from the varietal honeys available at The Honey Exchange. To reserve your spot, call Phil at The Honey Exchange at 207-773-9333.

I look forward to seeing you there!

Strawberry Thunder Mead

It’s June, therefore it’s time for another strawberry mead! This year I wanted to have a stronger strawberry flavor, to be a bit drier than past years, and to simplify the herbal process.

I started with a decoction of chaga and a sumac drupe, cooled and strained back into the carboy:

1.5 or 2 gallons of chaga/sumac tea

Next, I used double the amount of strawberries relative to last year — 2 quarts, which weighed 3 pounds – that were lovingly (and knee-achingly) picked by my wife and daughter this morning:

2 quarts/3 pounds of freshly-picked strawberries

Next, I juiced the strawberries in our juicer, which created about a quart and a half of strawberry juice:

1.5 quarts of fresh strawberry juice in the bottom of the stockpot

Next, I added the chaga sumac tea, a bit more water, and enough honey to get me to a 15% initial alcohol potential:

15% initial alcohol potential

Then I pitched the yeast into the carboy, poured the must in after it, and topped it off, to give me 3 gallons of strawberry thunder goodness:

3 gallons of Thunder Strawberry Goodness

I initially thought about calling this batch Strawberry Solstice Mead, but the Solstice was a few days ago, and right when I was making this batch a classic summer thunderhead blasted its way over our house. Strawberry Thunder it is! I expect this batch to be potent, and dry, and full of strawberry flavor. Time will tell!

UPDATE, 12 April 2014

This mead went for a very long time without clearing! It still isn’t clear which is somewhat of a rarity for me these days. I’m sure it’s because of the extra pectin from the abundance of strawberries I used. I finally racked it today and, while not clear, it is delicious, a bit sweet, and tastes strongly of strawberry, coming in at 12.5% alcohol, meaning there is 2.5% remaining alcohol potential, which is somewhere between semisweet and sweet. The strawberries add another layer of perceived sweetness so we’ll call this one a sweet mead.

Because it didn’t clear, I may end up not bottling it in the normal 750ml clear wine bottles, instead using smaller grolsch bottles or larger jugs, for use at fireside gatherings where it will be served in horns and the lack of clarity is not to be noticed. :-)

Kombucha

We’ve been enjoying Kombucha in the house on a regular basis for a couple of years now. I don’t make it, my wife Lisa Marie does. This entry on how she makes the kombucha has been in the works for nearly a year — let me publicly apologize for taking so long to post this. Thanks to Lisa Marie for outlining her method on kombucha for bardicbrews.net readers.

Kombucha is “an effervescent fermentation of sweetened tea.” But rather than using yeast to “eat” the sugar and create alcohol, we use something called a SCOBY. SCOBY stands for Symbiotic Culture Of Bacteria & Yeast. It is a coherent structure, almost like a “blob” or a collection of slime that looks like this:

This is a SCOBY
This is a SCOBY

In general it is best to get a SCOBY from someone willing to barter; paying for these things (unless it’s like a buck or something) is just dumb. Wrong energy, at least in Lisa Marie’s opinion. If you don’t know where to start, don’t start on the ‘net. Ask around at local health food stores, etc. You meet some of the coolest people this way. : )

You will also need a container for fermenting, NOT a carboy with an airlock. We prefer a traditional crock. We have also used a glass gallon jar, but didn’t get as nice a ferment out of it. Perhaps it was too much exposure to light? We don’t recommend using anything metal. Metal should never come in contact with your SCOBY or your fermented beverage. Check around yard sales or flea markets for cool crocks.

As always, use the best water you can. If there is fluoride or chlorine in your water it won’t help your brewing in any way.

Kombucha is also made with tea. We use the store brand of organic black tea. We prefer a caffeinated black or green tea to make my kombucha, though there are several variations and combinations of herbs and teas that could be used. This is where the internet is quite helpful. There are so many people experimenting with kombuchas these days, which is fantastic.

You will also need sugar. The type of sugar one should use is controversial. No, you can’t use honey because honey is an antibacterial and will kill your SCOBY. Different sugars will give you different-tasting kombuchas. Our advice is to always go as local as possible and use something as unrefined and as organic as possible. We use organic cane juice. I’ve been jonesin’ to try a local maple sugar. Maybe someday soon!

Add-ins… This is where the fun starts. The one we’ve been stuck on recently is Rosehip Kombucha. It’s fun to experiment, but definitely do your research first. Some plants and mushrooms are antibacterial and/or antiviral. Keep those away from your SCOBY! Add-ins can be added to the tea during fermentation (like the rosehips) or to the bottle before filling with the fermented tea (like spirulina powder, cider, or grated fresh ginger).

You will also need bottles, and other supplies like a funnel and a ladle. We prefer Grolsch bottles because they are easy to use, are re-usable, and don’t require new caps periodically. For making the tea you will need a wooden spoon and a strainer. Lastly, you will need a thin cloth like a handkerchief or a cloth napkin and a rubber band to cover the crock during fermentation.

The Process

This recipe for Rosehip Kombucha makes 1 gallon or about 6 12-oz. Grolsch bottles’ worth of ‘booch.

1. Boil 1 gallon of water:

100_7325

2. Turn off heat and add 1 c. sugar, 5 tea bags (or approximation of equivalent tea), and a couple handfuls of dried rosehips:

100_7326
1c. sugar, 5 black teabags, 2 handfuls of rosehips

3. Stir well with wooden spoon and let steep with lid on. If you are using black tea, do not let this steep for more than 10 minutes. Our research has shown that steeping times longer than 10 minutes release unhealthy amounts of fluoride into your teas.

4. Strain tea into crock:

Strain the tea into your crock

5. Cover with cloth and rubber band and let cool to room temp (test with pinky):

cover crock with a cloth & rubber band and let cool.

6. When cool to room temp, stir in (with your wooden spoon) about 1 cup of a previous batch of kombucha. Gently lay your SCOBY [my picture shows a mother with a few babies… some are thicker, some are thinner) on top of the tea mixture. Don’t worry if it sinks. It will eventually rise up in a day or so.

A one-gallon crock filled with sweetened tea, and a SCOBY floating on top. In time, this will be kombucha.

7. Cover with cloth and rubber band and label, if necessary.

'Booch during fermentation.
‘Booch during fermentation.

8. Most kombuchas take anywhere from 7-30 days to ferment. We always check ours after about 5 days to see where it’s at. Using a wooden or plastic spoon, take a sample from underneath the SCOBY and taste it. Some people like it more vinegary, some more sweet. When it tastes good to you, it’s ready to bottle.

9. For bottling, we prefer to use Grolsch bottles with re-useable seals at the top. It’s important to ladle the ‘booch slowly, with the bottle turned at a steep angle to preserve carbonation and prevent overflow.

Remember, some kombuchas are fizzy and some aren’t. This has to do with ingredients used and ambient temperature of the room in which you’re storing the kombucha, as well as how much sugar is left in the tea when you bottle. Some of our kombuchas have gone in with no fizz and have opened with quite a bang! To prevent a mess, always open a homebrew kombucha bottle over the sink!

Storage advice varies from person to person. We store ours outside the fridge and put in two each night for the next day. Refrigeration slows fermentation; I still want those yeasties working.

You’re going to get little kombucha stringies (some call them “threads”) or mini-mothers (little SCOBY) in your kombucha. They’re totally fine to ingest – and are actually quite beneficial to the gut! Go ahead: slug ’em back!

Above all, enjoy your ‘booch!

Chaibernation Mead

It’s been cold this week. Maine gets cold in the winter, but this past week has been like nothing I’ve seen in a long time, in terms of the number of cold days in a row. We haven’t seen 20 degrees Fahrenheit in nearly a week, and the lows have been in the negative double-digits.

Clearly it’s time to hibernate, and a hibernation mead is in order. This will be (for now) a plain mead, though I am definitely thinking about trying my first spiced mead. I began with basically the same recipe as Mad Trad D from the Mad Trad Trial: chaga and sumac with my basic mead recipe. This is a nice, rich decoction:

At the end of a 12-hour chaga decoction, I tossed a staghorn sumac drupe in for the last 15 minutes

Once I cooled it down to blood temperature, I added enough honey to get to a 16% initial alcohol potential:

16% initial alcohol potential

After I pitched the yeast, I was left with a beautiful brown must:

A plain mead.... for now.
A plain mead…. for now.

There will be more to this story…. spicing. Hmmm……

UPDATE: May 15, 2013

Much to my surprise, this mead has already mostly cleared. So I racked it today, as well as adding a spice packet to it. I thought a lot about what spices to add, and decided to emulate a chai spice (hence the modified name of Chaibernation Mead… heh heh). Specifically, I added a vanilla bean, a cinnamon stick, a few mace husks, cardamom seeds, black peppercorns, and dried red peppercorns:

Clockwise from top left: vanilla bean, mace husk, cinnamon stick, cardamom seeds, black peppercorns, red peppercorns.

Then I chopped them all up:

spices chopped up with my Becker BK15

And lastly, put them into a sealable teabag (sealed with an iron):

spice bag ironed shut.

I also took a hydrometer reading after I racked it, it is presently 2.5% alcohol potential, which means this is a semisweet mead at 13.5% alcohol. With the spicing mixture it should be great:

Racked mead, with a spice packet floating at the top. Normally I rack into 1 gallon jugs, but all my jugs are full at the moment so I used a spare carboy.

Next step: check the flavor profile on this starting in a couple of days. I don’t want the spice to be overwhelming.

UPDATE: May 23

The spices have been steeping for a week, and wow! Delicious thus far, but I want to let it go another week to let the spice flavor grow a bit stronger and settle in. This is gonna be a good one!

UPDATE: May 31

Tasted it again tonight, and it is perfect! Ready for bottling, which I will hopefully accomplish this weekend. Wow, this is really good! Will get even better when it ages…..

Fox Pyments: Two Are Better Than One

This year, my friends Arthur Haines and Nicole Leavitt from the Delta Institute of Natural History were kind enough to share their Fox Grapes with me and my wife. We split the grapes equally, Lisa Marie making jelly and me, of course, making grape mead, which is also called pyment. I thought about adding some herbs to this mead, but these grapes are so amazing I wanted to let them speak for themselves. Along the way, I had a bit of a mishap and had to readjust. Read on for details.

Fox Grapes (Vitis labrusca)

Fox grapes are native to North America’s east coast, and are one of the precursors to the famous Concord grape (which I used in last year’s Chaga Pyment). However, these Fox Grapes are larger than the feral Concord grapes we foraged last year:

wild Fox Grapes (Vitis labrusca)

After Lisa Marie made her grape jelly, I had about 3 pounds of stemmed grapes to work with:

about 3 pounds of stemmed, plucked Fox Grapes

Once they were stemmed and cleaned, we got out the juicer and I ended up with nearly a half gallon of grape juice:

3 pounds of grapes yielded nearly a half gallon of grape juice.

One thing to know when working with wild grapes is that they contain tartrate, which is a substance that is bitter and can irritate the skin and mucous membranes. If you eat more than a few wild grapes, you are likely to notice a slight burning or tingling sensation at the back of your tongue or the roof of your mouth; this is caused by the tartrate. The solution is to stick the grape juice in the refrigerator overnight, so the tartrate will tend to settle (in crystal form). Note that in mead, the tartrates will settle out during fermentation and end up as part of the sediment…. so I won’t use the sediment from this batch of mead for anything.

Oops! Too much honey!

I started with a strong chaga decoction, and poured the grape juice in with the chaga. However, when I added the honey, I had a mishap, and poured too much honey into the pot, giving me an off-the-chart alcohol potential of about 24%:

Oops! Too much honey, off the charts, nearly 24% alcohol potential.

So I had a decision to make. I could either have a VERY OBNOXIOUSLY sweet mead, or I could split this into 2 different batches. I had an open carboy so I chose the latter course, which of course will weaken the grape flavor a bit. Rather than make 2 more or less identical batches, I decided to make a Strong Fox Pyment with most of the grape juice, and a Weak Fox Pyment with about half of the grape juice. To accomplish this I poured off about a gallon of the oversweet must and set it aside:

About a gallon of the oversweet must poured off into another container, to be used for a 2nd batch of mead

Then, I used the remaining 2 gallons of oversweet must, added more water (and a bit more honey) to get me to a more reasonable alcohol potential of 17%:

Filled it back up to 3 gallons with spring water to get us to 17% alcohol potential. That’s more like it!

I pitched the yeast and poured it into the first carboy. Then I used the 1 gallon (or so) of the remaining oversweet must, put it into my stockpot, added more water and honey to get the Weak Fox Pyment to about 16% alcohol potential:

2nd batch, which will be weaker in grape flavor, up to 16% alcohol potential

I then pitched a second packet of yeast and added the must to another carboy, giving me to similar batches of pyment:

2 are better than one! The Strong Fox Pyment is on the left, with its deeper, richer color

When it’s all said and done, the Strong Fox Pyment should have a darker color and a stronger grape flavor than the Weak Fox Pyment, but they should be quite similar. Time will tell!

UPDATE, Jan 11

I racked the Weak Fox Pyment today, and it is a good dry-ish flavor at 2% remaining alcohol potential, which means it is 14% ABV. It is a lovely light color, crisp with a hint of grapes to it. Almost exactly what I was hoping for! The Strong Fox Pyment doesn’t seem quite ready to rack just yet.

UPDATE, March 31

Finally racked the Strong Fox Pyment. It too ended up at 2% remaining alcohol potential, making it 15% ABV. The color is much darker, and of course the grape flavor is stronger. Awesome!

Elderberry Rosehip Mead

Elderberries are one of my favorite berries to work with. 2010’s Elderberry Mead was one of my favorites that year (probably a close second behind the Wild Black Cherry Mead). Then in 2011 I made Elder Mead with Reishi and Rosehips accompanying the elderberries, and it was one of the most unique brews I’ve yet done — a serious power-pack for the immune system.

This year, I was able to get 2 quarts of beautiful elderberries from my friend David Homa, who runs Post Carbon Designs and is a Maine permaculture expert. I wanted to feature the Elderberries a bit more strongly this year, so I decided to use chaga rather than reishi due to reishi’s strong flavor profile. The rosehips went well with the elderberries, so I decided to dry a simpler Elderberry Rosehip mead.

I detailed many of the properties of both Elderberries and the Rosehips in the Elder Mead entry from 2011, so I won’t repeat that information here.

I started with a chaga decoction, this time made very strongly after simmering for about 20 hours. Then, I fished out the chunks of chaga so that I can re-use them for tea:

Strong chaga decoction

Then I turned off the heat, tossed in 2 handfuls of rose hips, let it steep for about 15 minutes, then put in the sink to cool off:

Chaga decoction with rosehip infusion cooling in the sink. Note the sunlight through the forest reflecting in the liquid…. :-)

Then, I juiced the 2 quarts of elderberries using our juicer. I was surprised at how much it yielded, about 1.25 quarts of juice:

This is a 1.7 quart container, so I figure this is at least 1.25 quarts of elderberry juice. Maybe 1.4 or so.

Mixed together with enough honey to get it up to 16% initial alcohol potential, it makes for a beautifully-colored wort, as usual with the elderberries:

Elderberries, rosehips, chaga, and honey make for a beautifully-colored must!

As always, I can’t wait to see how this turns out!

UPDATE: Nov 25

Just racked this mead to find a 2% remaining alcohol potential, which means it is 14% alcohol. It’s semisweet, and kind of young mead bitter, but should be excellent when it’s had a chance to age a bit.

Husk Cherry Mead

For a while now, I’ve been wondering what a tomato mead would be like. I’ve heard of basil being successful in mead also, so I’ve been imagining what some of these flavors might be in a mead. I haven’t quite had the guts to make a tomato mead though.

Until now.

Husk Cherry (Physalis pruinosa)

Husk Cherry (Physalis pruinosa) is a member of the Physalis family, so it is a nightshade and in the tomato family. P. pruinosa is also sometimes called “Strawberry Groundcherry,” “Cape Gooseberry,” and of course “Husk Cherries” (specifically the “Goldie variety” from the seed supplier). Physalis is most known for the husks that surround the fruit:

A single husk cherry with its husk partially removed. This is about the size of a small strawberry.

The husk cherries definitely have a tomato-ish vibe, but they aren’t nearly as tart or intense as a tomato. The flavor is sweeter and lighter, and the overtones are more like pineapple than tomato. Delicious!

Our CSA Farm (Deri Farm in North Yarmouth Maine) happened to have some extra husk cherries this year, so I grabbed up 2 quarts right away, and made sure the husks were all peeled away (thanks LM for the help!).

I begin this batch basically the same way as Mad Trad D, with a good, strong chaga decoction and a staghorn sumac drupe put it for the last 5 minutes of simmer:

Chaga & Staghorn Sumac tea

While the tea was cooling, I put the husk cherries into the high speed blender:

Husk cherries, peeled and about to be juiced

They were whizzed up and strained, and added to the cooled, strained tea:

Husk cherry juice mixed with chaga/sumac tea

Then, I added enough honey so that it would top off at about 16% alcohol (I’m envisioning a drier mead for this flavor):

16% initial alcohol potential.

The husk cherries didn’t color the final must too much, but it looks beautiful, a nice deep brown that will likely fade as we get into secondary fermentation:

Husk Cherry Mead!

I can’t wait to see how this comes out!

UPDATE: Nov 25

Just racked this mead, it’s beautifully gold in color, with 1% remaining alcohol potential, meaning this brew is 15% alcohol. Very nice flavor! It’s dry but you can definitely taste the husk cherries…..

Still space left!

Thanks to all of you who have registered for the Beginning & Intermediate Lore And Craft Of Mead workshop coming up on July 28th. The workshop is over half-full as of now, so there are still a few spaces left! It is filling up quickly though so get your registration in as soon as possible.

The Lore And Craft Of Mead Workshop
$50 registration
[WORKSHOP IS OVER. Watch for future workshops!]

Interview at PoppySwap.com

The good folks at poppyswap.com recently asked for an interview on the intersection between fermentation and herbalism. I was only too happy to oblige. I really enjoyed doing this interview and I think it came out well. Head on over to check it out:

In modern herbalism, making tinctures with, say, 80 proof vodka is common, but we often forget that distilled alcohol has only been widely available for 400 or 500 years. Prior to this, herbalists had to make their own alcohol. Before distillation techniques became widely available, we had a “ceiling” in terms of alcohol content of about 18 to 20%, or about 40 proof. This is the percentage of alcohol we can get before there is too much alcohol present for the yeast to survive, which brings up an interesting point/metaphor — can you think of another organism besides yeast that gradually toxifies its environment with its waste products, until it can no longer survive?

. . .

I view mead as the highest alchemical expression of a given ecosystem. Honey is nearly ubiquitous to the planet, you have to go to the extreme latitudes before you can no longer find honey. I view honey as the lifeblood of an ecosystem, and when we use this precious substance as the sugar for fermentation we are creating beverages on the highest order of what the ecosystem has to offer.

. . .

If you haven’t yet tried mead, I suggest you get some as soon as you can and share it with friends, preferably under the stars and around a fire, with a song or a poem. While there have been some very exciting developments in commercial meaderies over the past decade (meadmaking is undergoing a similar renaissance to what microbrewed beers underwent 2 decades ago), all of the best meads I’ve tried have been homebrewed, either by me or my tribe. Try to find a meadmaker near you, chances are they will be thrilled to share their mead and their enthusiasm with you.

The above are just three excerpts from the interview. I’m so excited to have been introduced to this very cool community of herbalists!